domingo, 2 de marzo de 2025
domingo, 26 de enero de 2025
Proyecto Yarvis
Zyra Project
Este proyecto es un asistente virtual llamado Zyra que puede realizar diversas tareas como reconocimiento de voz, control de medios, análisis de sentimientos, gestión de finanzas, generación de informes, juegos interactivos, autenticación de seguridad, monitoreo de salud, reconocimiento de emociones, soporte educativo, integración de mensajería, recomendaciones, asistencia culinaria, asistencia de viajes, reconocimiento facial, reconocimiento de voz, integración de noticias, integración de hogar inteligente, integración de streaming, reconocimiento de ubicación y soporte de idiomas.
## Estructura del Proyecto
```
Zyra_project/
├── main.py
├── jarvis.py
├── README.md
├── requirements.txt
├── config/
│ └── config.py
├── utils/
│ ├── __init__.py
│ ├── calendar_utils.py
│ ├── media_control.py
│ ├── sentiment_analysis.py
│ ├── finance_management.py
│ ├── report_generation.py
│ ├── interactive_games.py
│ ├── security_auth.py
│ ├── health_monitoring.py
│ ├── emotion_recognition.py
│ ├── educational_support.py
│ ├── messaging_integration.py
│ ├── recommendations.py
│ ├── cooking_assistant.py
│ ├── travel_assistant.py
│ ├── face_recognition.py
│ ├── voice_recognition.py
│ ├── news_integration.py
│ ├── smart_home_integration.py
│ ├── streaming_integration.py
│ ├── location_recognition.py
│ ├── language_support.py # Añadido
│ ├── gastos_personales.py # Añadido
```
## Instalación
Clona el repositorio:
git clone https://github.com/tu_usuario/jarvis_project.git
Navega al directorio del proyecto:
cd jarvis_project
Instala las dependencias:
pip install -r requirements.txt
## Uso
Ejecuta el archivo main.py para iniciar Jarvis:
python main.py
## Contribución
Si deseas contribuir a este proyecto, por favor sigue los siguientes pasos:
1. Haz un fork del repositorio.
1. Crea una nueva rama (git checkout -b feature/nueva-funcionalidad).
1. Realiza tus cambios y haz commit (git commit -am 'Añadir nueva funcionalidad').
1. Sube tus cambios a tu fork (git push origin feature/nueva-funcionalidad).
1. Crea un nuevo Pull Request.
## Licencia
Este proyecto está licenciado bajo la Licencia MIT. Consulta el archivo LICENSE para más detalles.
viernes, 18 de mayo de 2018
Become a MySQL DBA blog series - Database High Availability
This is the third installment in the ‘Become a MySQL DBA’ series, and discusses the pros and cons of different approaches to high availability in MySQL. Our previous posts in the DBA series include Backup and Restore and Monitoring & Trending.
High Availability - what does it mean?
Availability is somewhat self-explanatory. If your database can be queried by your application, it is available. High, on the other hand, is a separate story. For some organizations, ‘high’ means max several minutes of downtime over the year. For others, it might mean a few hours per month. If you’ve read the previous blogs in this series, you may have noticed a pattern - “it depends on the business requirements”. This applies here also - you need to know your requirements in terms of how long downtime you can accept as it may limit your HA options significantly. What you need to keep in mind is that the length of a database incident, that causes some disturbance in database access, may be related to the HA method you choose. On the other hand, whether this disturbance affects end users is a different thing. For starters - does your application use a cache? How often does it need to be refreshed? Is it acceptable for your application to show stale data for some period of time? And for how long?
Caching Layer - for database reads and writes?
A cache that sits between the application and the database might be a way of decoupling those two from each other.
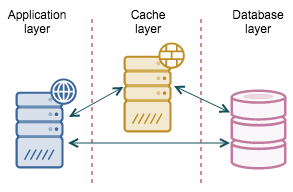
With writes, it is a similar story - you may want to cache writes in a queue. In the background, you would have threads that read the data out of the queue and store them into the database. Ideally those background threads keep the queue empty and any write request is handled immediately. If the database is down, the queue can serve as a write buffer - the application can still make modifications to the data but the results are not immediately stored in the database - they will be later on, when the database gets back online and the background threads start working on the backlog.
There are many ways to keep users happy and unaware of the issues behind the scenes - all user-related modifications can be immediately presented to the user, to give an impression that everything is just fine. Other users will not see those changes until the write queue is flushed to the database. Of course, it depends on what kind of data we are talking about - in many cases (e.g., social media site, web forum, chat engine, comment engine), it might be just fine. One way or another, this “illusion” can be maintained only for some period of time though. Eventually, the database has to be brought up again. Let’s talk now about our options for database high availability.
Block-level replication (DRBD)
We’ll start with DRBD - Distributed Replicated Block Device. In short, imagine that you could create a RAID1 over the network. This is, more or less, what DRBD does. You have two nodes (or three in the latest versions), each of them have a block device dedicated to storing data. One of them is in active mode, mounted and basically works as a database server. The rest of them are in passive standby mode - any changes made on the active node’s block device are replicated to the passive nodes and applied. Replication can be synchronous, asynchronous or memory synchronous. The point of this exercise is that, should the active node fail, the passive nodes have an exact copy of the data (if you use replication in synchronous mode, that is). You can then promote a passive node to active, mount the block volume, start the services you want (like, MySQL for example), and you have a replacement node up and running.

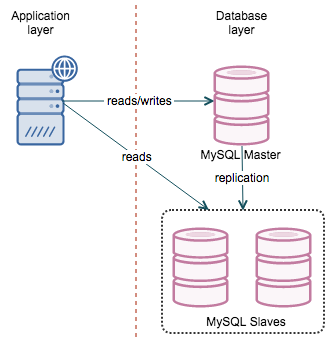
MySQL replication
MySQL replication is one of the oldest and probably the most popular way of achieving MySQL high availability. The concept is simple - you have a master that replicates to one or more slaves. If a slave goes down, you use another slave. If the master is down, you promote one of the slaves to act as a new master. When you get into details, though, things become more complex.
- You need to locate the most advanced slave
- If there are more of them, pick one as a new master and reslave the rest to the new master
- If there is only one “most advanced” slave, you should try to identify missing transactions and replay them on the rest of the slaves to get them in sync
- If #3 is not possible, you’ll have to rebuild slaves from scratch, using the data from the new master
- Perform the switch (change proxy configuration, move virtual IP, anything you need to move the traffic to the new master)
Along with MySQL 5.6, Oracle introduced Global Transaction Identifiers and this opened a whole new world for HA possibilities in MySQL replication. For starters, you can easily reslave any slave to any master - something which had not been possible with regular replication. There is no need to check binlog positions, all you need to know is CHANGE MASTER TO … MASTER_AUTO_POSITION=1; Even though the reslaving part is easy, you still have to keep an eye on the slave’s status and determine which one will be the best candidate for a master. Regarding tooling: MHA can be used in GTID replication in a similar way as with regular replication. In addition, in such setup it is possible to use binlog servers as a source of missing transactions. Oracle also created a tool - mysqlfailover which performs periodical or constant health checks for the system and has support for both automated and user-initiated failover.
The main issue with standard MySQL replication is that by default it is asynchronous which means, in short, that in the event of master’s crash, it is possible that not all transactions were replicated to at least one of the slaves. If a master is not accessible (so tools like MHA can’t parse its binlogs to extract missing data), it means that this data is lost. To eliminate this problem, semi-sync replication was added to MySQL. It ensures that at least one of the slaves got the transaction and wrote it in its relay logs. It may be lagging but the data is there. Therefore, if you use MySQL replication, you may consider setting up one of your slaves as a semi-sync slave. This is not without impact, though - commits will be slower since the master needs to wait for the semi-sync slave to log the transactions. Still, its something that you may want to consider - it is possible that for your workload it won’t make a visible difference. By default, ClusterControl works in this mode with MySQL replication. If you are using GTID-based failover, you should also be aware of Errant Transactions.
Clustering
The ultimate solution to HA is to use a synchronous (or at least “virtually” synchronous) cluster. This leads us to MySQL Cluster and Galera (in all it’s flavors).
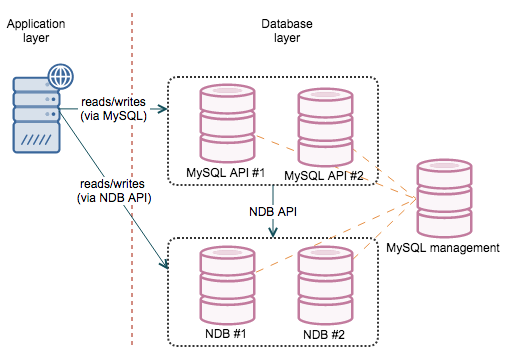
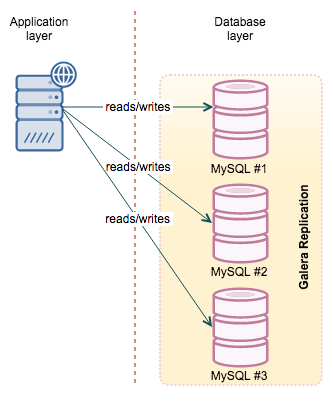
Both clusters, practically speaking (there are some exceptions on both sides), work as a single instance. Therefore it is not important which node you connect to as long as you get connected - you can read and write from any node.
From those options, Galera is a more likely choice for the common user - its workload patterns are mostly close to the standalone MySQL, maintenance is also somewhat similar to what users are used to do. This is one of the biggest advantages of using Galera. MySQL Cluster (NDB) may be a great fit for your needs but you have to do some testing to ensure its indeed the case. This webinar discusses the differences between Galera and NDB.
Proxy layer
Having MySQL setup one way or another is not enough to achieve high availability. Next step would be to solve another problem - how should I connect to the database layer so I’ll always connect to hosts which are up and available?
Here, a proxy layer can be very useful. There are couple of options to pick from.
HAProxy
HAProxy is probably the most popular software proxy out there, at least in MySQL world. It is fast, easy to configure and there are numerous howto’s and config snippets in the Internet which makes it easy to set it up. On the other hand, HAProxy does not have any sophisticated database logic and is not aware of what’s going on in MySQL or Galera Cluster. It can check MySQL’s port but that’s all - it’s either up or down. It can be a serious problem for both regular replication and setups based on Galera Cluster.
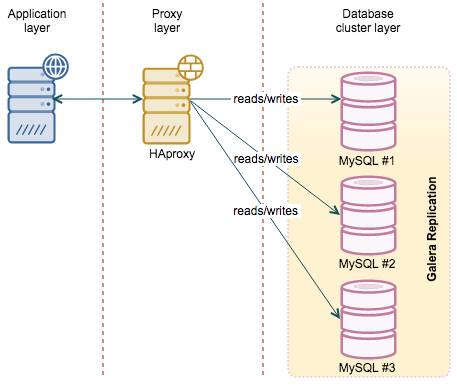
HAProxy, out of the box, do not have any options to handle such cases. It has a feature which we may utilize to enhance its abilities - HTTP check. Basically, instead of checking if a given port is open or close, HAProxy may do a HTTP connection to a given port. It it receives 200 code, it assumes that the service is up. Any other code, let’s say 503 (which is pretty popular in scripts) will trigger ‘service down’ state. This, along with xinetd and a simple (or more complex) script allows a DBA to implement more complex logic behind the scenes. The script may check the MySQL replication topology and return the correct error code depending on whether a host is a slave or not, depending on which backend is used (usually we define one backend for a master and one for all slaves, as described here). For Galera, it may check the node’s state and, based on some logic, decide if it’s ok to serve reads from the node or not.
MaxScale
One of the latest additions to the MySQL ecosystem is MaxScale, a proxy developed by MariaDB Corporation. The main difference over HAProxy is that MaxScale is database-aware. It was designed to work with MySQL and it gives a DBA more flexibility. It also has a significant number of features, in addition to being a proxy. For example, should you need a binlog server, MaxScale may help you here. From an HA point of view though, the most important feature is its ability to understand MySQL states. If you use regular replication, MaxScale will be able to determine which node is the master and which one is a slave. In case of failover, this makes one less config change to keep in mind. In case of Galera Cluster, MaxScale has the ability to understand which node is joined and which is not. This helps to keep traffic away from nodes which are, for example, receiving incremental state transfer. If you have Galera, MaxScale also picks up one of the nodes as a “master” even though there is no “master” in a sense of normal replication. It is still very useful - in case you’d like to perform a read/write split (to avoid deadlocks, for example), you can rely on the proxy to direct your writes to a single node in the cluster while the reads will hit the other nodes. We previously blogged about how to deploy/configure MaxScale.

HA for proxies
So, here we are, our database and proxy layers are up and running. Proxies are configured to split the workload across the database layer, ensuring that traffic is served even if some of the database instances are down. Next problem to solve is - what happens if your proxy goes down? How do you route traffic to your databases?
If you use Amazon Web Services, Elastic Load Balancer (ELB) is a great tool to solve this problem. All you need to do is to set it up with proxy nodes as backend and you are all good. Under the hood AWS will create several ELB instances that will be highly available and will route the traffic to those proxy nodes which are up.
If you do not use AWS, you may need to develop some other method. One of them could be to have a virtual IP assigned to one of the proxy instances. If the instance is down, the IP will be moved to another proxy. Keepalived is one of the tools that could provide this kind of functionality, but there are others as well. One of the advantages of this setup is that you only have two proxy nodes on which you need to introduce configuration changes (as compared to a number of instances, as described in the next paragraph). Two nodes is the minimal requirement for HA. The disadvantage is that only one of them will be up at any given time - this could be a limitation if the workload is high.
Another approach could be to collocate proxy servers on application servers. Then you can configure the application to connect to the database nodes using a proxy installed on localhost. The reasoning behind it is that by sharing hardware we minimize the chance that the proxy will be down while application server will be up. It is more probable that both services will be either up or down and if a given application instance works, it will be able to connect to the proxy. The main advantage of this setup is that we have multiple proxy nodes, which helps to scale. On the other hand, it is more cumbersome to maintain - any configuration changes have to be introduced on every node.
Do we need a proxy layer?
While a proxy layer is useful, it is not required. It’s especially true if we are talking about Galera Cluster. In such case you can as well read and write to any of the nodes and if a given node doesn’t respond, you can just skip it and move the next one. You may encounter issues with deadlocks but as long as you are ok with it (or you can work around them), there’s no need to add additional complexity. If you’d like to perform an automated failover in MySQL replication, things are different - you have a single point where you can write - a master. One of possibilities is to use a virtual IP as a point where the application can write. Then you can move it from host to host, following the replication chain changes, ensuring that it always points to the current master.
Split-brain scenarios
There are cases where issues in communication between data replicas may lead to two separate data sets, each one randomly serving applications without coordinating with the other one.
Let’s take a look at the simplest example - one master, two slaves, VIP pointing to the master, automated failover.
- Master loses network connection
- Failover is deemed as needed
- one of the slaves is staged to be a new master
- the other slave is reslaved
- VIP is assigned to the new master.
It’s hard to get protected against such situation. What you want to do is to have a STONITH implemented (Shoot The Other Node In The Head, one of the nicest acronyms in IT). Basically, you want to ensure that after a successful failover, the former master is down as in “down and will never come back up”. There are numerous ways to achieve this and it mostly depends on your environment. Barebone servers are more flexible here.
You may want to use a separate network to form a “backup” link - one switch, couple of patchcords. Something disconnected from main network, routers etc. You can use such a connection to check the health of the other node - maybe it’s just a primary network that failed? Such dedicated connection can also be used for a IPMI or some other KVM-ish access. Maybe you have access to the manageable power strip and you can turn off a power outlet? There are many ways to shutdown the server remotely if you are in the datacenter. In a cloud environment, things are different but the least you could do is to utilize different NIC’s and create a bonded interface (keeping fingers crossed that, behind the scenes, they do not use exactly the same hardware). If using AWS, you can also try and stop the node using the EC2 CLI.
We are aware that this topic is more suitable for a book than a mere blog post. High Availability in MySQL is a complex topic which requires plentiful of research and depends heavily on the environment that you use. We’ve tried to cover some of the main aspects, but do not hesitate to hit the comment button and let us know your thoughts.
martes, 3 de octubre de 2017
Docker Container
How to Get Shell Access to Running Docker Container
#1. Using Docker Attach
You can get bash shell access in your docker container with attach command. But your docker container must be started with /bin/bash.Use below syntax to get shell access of docker container.
$ sudo docker attach <CONTAINER ID/NAME>For example, your docker container is running with id 76debad837d2 and name happy_tecadmin. Use one of the following commands with attach method.
Using Container ID:
$ sudo docker attach 76debad837d2Using Container Name:
$ sudo docker attach happy_tecadmin
#2. Using Docker Exec
If docker container was not started with /bin/bash command. Then you can’t use attach command. Now, you need to use exec command to create bash in your container. Make sure you are using Docker version >= 1.3.Use below syntax to get shell access of docker container.
$ sudo docker exec -it <CONTAINER ID/NAME> bashFor example, your docker container is running with id 76debad837d2 and name happy_tecadmin. Use one of the following commands with exec method.
Using Container ID:
$ sudo docker exec -it 76debad837d2 bashUsing Container Name:
$ sudo docker exec -it happy_tecadmin bash
How to Create, List & Delete Docker Containers on Linux
#1. Launch Docker Container
To launch a new Docker container using below command. This will start a new container and provide you access to that container with /bin/bash shell.# docker run [OPTIONS] <IMAGE NAME> [COMMAND] [ARG...] For example below command will create new docker container using the image named “ubuntu”. To list all available images use
docker images command.# docker run -i -t ubuntu /bin/bash To exit from docker container type CTRL + P + Q. This will leave container running in background an provide you host system console. If you used exit command, it will stop the current container. Click here to read for more options about docker run command.
#2. List Docker Containers
After existing from Docker container, execute below command to list all running containers.# docker ps CONTAINER ID IMAGE COMMAND CREATED STATUS PORTS NAMES f2582758af13 ubuntu "/bin/bash" 2 hours ago Up 2 hours first_ubuntu By default Above command will list only running containers. To list all containers (including stopped container) use following command.
# docker ps -a CONTAINER ID IMAGE COMMAND CREATED STATUS PORTS NAMES f2582758af13 ubuntu "/bin/bash" 2 hours ago Up 2 hours first_ubuntu 6b5b5a969241 centos "/bin/bash" 2 days ago Exited (0) 24 hours ago ubuntu-web
#3. Start/Stop/Attach Container
You can start, stop or attach to any containers with following commands. To start container use following command.# docker start <CONTAINER ID|NAME> To stop container use following command.
# docker stop <CONTAINER ID|NAME> To attach to currently running container use following command.
# docker attach <CONTAINER ID|NAME>
#4. Drop Docker Container
Before deleting any container make sure that container is stopped. You can use ‘docker ps -a’ command to list status of containers. If container is still running first stop that container using given commands in above step.Now use the following command to delete single or multiple containers.
# docker rm <CONTAINER ID|NAME> <CONTAINER ID|NAME> You can also delete all stopped containers at once using the following command.
# docker rm $(docker ps -a -q)
How to Search, Pull, List & Delete Docker Images on Linux
Search Docker Images
First of all search Docker container images from Docker hub. For example, below command will search all images with Ubuntu and list as output# docker search ubuntuThe result will look like below
NAME                              DESCRIPTION          STARS     OFFICIAL   AUTOMATED

ubuntu                            Ubuntu is a Deb...   3318      [OK]
ubuntu-upstart                    Upstart is an e...   60        [OK]
torusware/speedus-ubuntu          Always updated ...   25                   [OK]
ubuntu-debootstrap                debootstrap --v...   24        [OK]
rastasheep/ubuntu-sshd            Dockerized SSH ...   22                   [OK]
neurodebian                       NeuroDebian pro...   17        [OK]
nuagebec/ubuntu                   Simple always u...   4                    [OK]
nickistre/ubuntu-lamp-wordpress   LAMP on Ubuntu ...   4                    [OK]
nimmis/ubuntu                     This is a docke...   3                    [OK]
Pull Docker Images
Now pull required docker image from docker hub on your local system using following commands. Below command will download image named “ubuntu”.# docker pull ubuntu latest: Pulling from library/ubuntu fa5be2806d4c: Pull complete b4af4261cb15: Downloading [==> ] 3.779 MB/70.55 MB 5d358abc5d9c: Download complete 2933d50b9f77: Download completeWe are also downloading centos images from docker hub.
# docker pull centos
List Docker Images
Now make sure that above images has been downloaded successfully on your system. Below command list all images.# docker images REPOSITORY TAG IMAGE ID CREATED VIRTUAL SIZE ubuntu latest 36248ae4a9ac 2 hours ago 188 MB centos latest 2933d50b9f77 2 hours ago 196.6 MB
Remove Docker Images
To remove an images, Docker provides rmi option. Using this we can delete any docker images from our local system. For example use below command with changing IMAGE ID with your Docker image id.# docker rmi <IMAGE ID>or you can simply remove images using repository name (image name)
# docker rmi ubuntuIn case you have two images with same name, add tag name while deletion
# docker rmi ubuntu:latest
How to Move Docker Images between Hosts
List Docker Images
Fist list docker images on your system using below command.root@tecadmin:~# docker images REPOSITORY TAG IMAGE ID CREATED VIRTUAL SIZE centos latest 2933d50b9f77 11 days ago 196.6 MB ubuntu latest 36248ae4a9ac 11 days ago 188 MB
Save or Archive Image
Now use the following command to save image repository named ubuntu (image id: 36248ae4a9ac) and make a zipped archive named ubuntu-latest.tar.gz. Remember that save is used for making backup of docker images (not containers).# docker save ubuntu | gzip > ubuntu-latest.tar.gz
Import Image
After saving docker image in archive format on your system move it to remote system using scp or ftp. After that use below command on remote system to import Docker image with name ubuntu and tag name latest.# zcat ubuntu-latest.gz | docker import - ubuntu:latest The above command will create a docker image with name ubuntu and tag name latest on your system. You can now launch containers using this image like below.
# docker run -i -t ubuntu /bin/bash
How to Export and Import Docker Containers
List Containers
Fist list all containers on your system using below command. Using ps -a will list all containers (running and stopped) from your system.root@tecadmin:~# docker ps -a CONTAINER ID IMAGE COMMAND CREATED STATUS PORTS NAMES f2582758af13 ubuntu "/bin/bash" 2 hours ago Up 2 hours ubuntu-web 2b199b9976c4 centos "/bin/bash" 3 days ago Up 3 hours centos-mysql
Export Container
Finally use the following command to export container named ubuntu-web (container id: f2582758af13) and make a zipped archive named ubuntu-web.tar.gz. Remember that export is used for making backup of docker containers (not images) in image format.# docker export ubuntu-web | gzip > ubuntu-web.tar.gz
Import Container
After exporting docker container on your system move it to remote server using scp or ftp. After that use below command on remote server to import Docker container on remote server with name ubuntu-web.# zcat ubuntu-web.gz | docker import - ubuntu-webThe above command will create a docker image on your system. You can now launch a container from this image using below command.
# docker run -i -t ubuntu-web /bin/bash
How to Remove Docker Images and Containers
Remove Docker Images
To remove an images, Docker provides rmi option. Using this we can delete any docker images from our local system. For example use below command with changing <IMAGE ID> with your Docker image id.# docker rmi <IMAGE ID> To find all images on your system use following command. This will help you to find ID of images.
root@tecadmin:~# docker images REPOSITORY TAG IMAGE ID CREATED VIRTUAL SIZE centos latest 2933d50b9f77 11 days ago 196.6 MB ubuntu latest 36248ae4a9ac 11 days ago 188 MB
Remove Docker Containers
To remove a containers, Docker provides rm option. Using this we can delete any docker containers from our local system. For example use below command with changing<CONTAINER ID> with your Docker container id.# docker rm <CONTAINER ID> To list all containers on your system using ps option, but ps will show only running containers. So to view all containers use -a parameter with ps.
root@tecadmin:~# docker ps -a CONTAINER ID IMAGE COMMAND CREATED STATUS PORTS NAMES f2582758af13 ubuntu "/bin/bash" 2 hours ago Up 2 hours first_ubuntu 2b199b9976c4 centos "/bin/bash" 3 days ago Up 3 hours thirsty_yalow
Stop & Remove All Docker Containers
If you want to remove all docker containers. You can use simply following commands. The first command will stop all running docker containers and the second command will delete them.Stop All Containers
# docker stop $(docker ps -a -q) Remove All Containers
# docker rm $(docker ps -a -q)
How to Install and Manage Docker Engine on CentOS/RHEL & Fedora
#1 – Verify Requirements
For standard installation Docker required 64 bit operating system having Kernel >= 3.10 version. Older versions of Kernel have some missing requirements to run all features of Docker.$ uname -r 3.19.0-49-genericAlso install the following packages on your system.
$ sudo yum install -y yum-utils device-mapper-persistent-data lvm2
#2 – Add Docker Yum Repository
Let’s add the official Docker yum repository on your system.$ sudo yum-config-manager --add-repo https://download.docker.com/linux/centos/docker-ce.repo
#3 – Install Docker
First update the yum chache for local system.$ sudo yum makecache fastNow install docker community edition package to install docker on your system. This is install many of required decencies on your system.
$ sudo yum install docker-ceAfter successful installation of Docker engine, Let’s start the docker service.
$ sudo service docker start
4. Manage Docker Container
Search Docker Images
First of all search Docker container images from Docker hub. For example, below command will search all images with Ubuntu and list as output# docker search centos
Download Docker Images
Now download the Docker container with name Ubuntu on your local system using following commands.# docker pull ubuntu latest: Pulling from library/ubuntu fa5be2806d4c: Pull complete b4af4261cb15: Downloading [==> ] 3.779 MB/70.55 MB 5d358abc5d9c: Download complete 2933d50b9f77: Download completeNow make sure that above images has been downloaded successfully on your system. Below command list all images.
# docker images

REPOSITORY  TAG            IMAGE ID            CREATED             VIRTUAL SIZE
ubuntu      latest         36248ae4a9ac        2 days ago          188 MB
centos      latest         2933d50b9f77        2 days ago          196.6 MB
Launch New Container with Image
Finally launch a Docker container using above downloaded image on your system. Below command will start a new container and provide you access of that container with /bin/bash shell.# docker run -i -t ubuntu /bin/bashTo exit from docker container type CTRL + P + Q. This will leave container running in background an provide you host system console. If you used exit command, it will stop the current container.
After existing from Docker container, execute below command to list all running containers.
# docker ps

CONTAINER ID     IMAGE     COMMAND        CREATED        STATUS        PORTS    NAMES
f2582758af13     ubuntu    "/bin/bash"    2 hours ago    Up 2 hours             first_ubuntu
By default Above command will list only running containers. To list all containers (including stopped container) use following command.
# docker ps -a
Start/Stop/Attach Container
You can start, stop or attach to any containers with following commands. To start container use following command.# docker start <CONTAINER ID>To stop container use following command.
# docker stop <CONTAINER ID>To attach to currently running container use following command.
# docker attach <CONTAINER ID>
How to Install and Manage Docker CE on Ubuntu 16.04 & 14.04 LTS
#1 – Install Requirements
First of all install the required packages for docker installation.$ sudo apt-get install apt-transport-https ca-certificates curl software-properties-commonFor standard installation Docker required 64 bit operating system having Kernel >= 3.10 version. Older versions of Kernel have some missing requirements to run all features of Docker.
$ uname -r

4.4.0-21-generic
Ubuntu 14.04 LTS users recommended to install the linux-image-extra kernel package.
$ sudo apt-get install linux-image-extra-$(uname -r)
#2 – Add Docker Apt Repository
Import dockers official GPG key to verify packages signature before installing them with apt-get.$ curl -fsSL https://download.docker.com/linux/ubuntu/gpg | sudo apt-key addRun the below comamnd to enable the docker official apt-get repository on your system. This will add entry in systems /etc/apt/sources.list file.
$ sudo add-apt-repository "deb [arch=amd64] https://download.docker.com/linux/ubuntu $(lsb_release -cs) stable"
#3 – Install Docker on Ubuntu
Remove the old packages installed on your system and purge them using below command.$ sudo apt-get purge docker lxc-docker docker-engineNow use the following commands to upgrade apt index and install docker engine on your system.
$ sudo apt-get update
$ sudo apt-get install docker-ce
After successful installation of Docker ce, the service will start automatically, Use below command to verify service status.
$ sudo systemctl status dockerUse our Docker Tutorial for Beginners to working with Docker.
#4 – Manage Docker Container
Search Docker Images
First of all search Docker container images from Docker hub. For example, below command will search all images with Ubuntu and list as output.# docker search ubuntu
Download Docker Images
Now download the Docker container with name Ubuntu on your local system using following commands.# docker pull ubuntu latest: Pulling from library/ubuntu fa5be2806d4c: Pull complete b4af4261cb15: Downloading [==> ] 3.779 MB/70.55 MB 5d358abc5d9c: Download complete 2933d50b9f77: Download completeNow make sure that above images has been downloaded successfully on your system. Below command list all images.
# docker images

REPOSITORY  TAG            IMAGE ID            CREATED             VIRTUAL SIZE
ubuntu      latest         36248ae4a9ac        7 days ago          188 MB
Launch New Container with Image
Finally launch a Docker container using above downloaded image on your system. Below command will start a new container and provide you access of that container with /bin/bash shell.# docker run -i -t ubuntu /bin/bashTo exit from docker container type CTRL + P + Q. This will leave container running in background an provide you host system console. If you used exit command, it will stop the current container.
After existing from Docker container, execute below command to list all running containers.
# docker ps

CONTAINER ID     IMAGE     COMMAND        CREATED        STATUS        PORTS    NAMES
f2582758af13     ubuntu    "/bin/bash"    2 hours ago    Up 2 hours             first_ubuntu
By default Above command will list only running containers. To list all containers (including stopped container) use following command.
# docker ps -a
Start/Stop/Attach Container
You can start, stop or attach to any containers with following commands. To start container use following command.# docker start <CONTAINER_ID>To stop container use following command.
# docker stop <CONTAINER_ID>To attach to currently running container use following command.
# docker attach <CONTAINER_ID>
martes, 7 de febrero de 2017
Linux KVM: Disable virbr0 NAT Interface
Display Current Setup
Type the following command:# ifconfigSample outputs:
virbr0    Link encap:Ethernet  HWaddr 00:00:00:00:00:00
          inet addr:192.168.122.1  Bcast:192.168.122.255  Mask:255.255.255.0
          inet6 addr: fe80::200:ff:fe00:0/64 Scope:Link
          UP BROADCAST RUNNING MULTICAST  MTU:1500  Metric:1
          RX packets:0 errors:0 dropped:0 overruns:0 frame:0
          TX packets:39 errors:0 dropped:0 overruns:0 carrier:0
          collisions:0 txqueuelen:0
          RX bytes:0 (0.0 b)  TX bytes:7921 (7.7 KiB)
Or use the following command:# virsh net-listSample outputs:
Name                 State      Autostart
-----------------------------------------
default              active     yes
To disable virbr0, enter:
# virsh net-destroy default
 # virsh net-undefine default
 # service libvirtd restart
 # ifconfig
jueves, 14 de julio de 2016
How To Set Up MySQL Master-Master Replication
https://www.digitalocean.com/community/tutorials/how-to-set-up-mysql-master-master-replication
Intro
This second installment of "Scaling Web Applications" will list out the steps necessary for scaling a mysql deployment over two VPS.The first article in this series laid out the steps needed to load-balance nginx over two VPS, and it is recommended that you read that article first.
MySQL replication is the process by which a single data set, stored in a MySQL database, will be live-copied to a second server. This configuration, called "master-slave" replication, is a typical setup. Our setup will be better than that, because master-master replication allows data to be copied from either server to the other one. This subtle but important difference allows us to perform mysql read or writes from either server. This configuration adds redundancy and increases efficiency when dealing with accessing the data.
The examples in this article will be based on two VPS, named Server C and Server D.
Server C: 3.3.3.3
Server D: 4.4.4.4
Step 1 - Install and Configure MySQL on Server C
The first thing we need to do is to install the mysql-server and mysql-client packages on our server. We can do that by typing the following:sudo apt-get install mysql-server mysql-clientBy default, the mysql process will only accept connections on localhost (127.0.0.1). To change this default behavior and change a few other settings necessary for replication to work properly, we need to edit /etc/mysql/my.cnf on Server C. There are four lines that we need to change, which are currently set to the following:
#server-id              = 1
#log_bin                = /var/log/mysql/mysql-bin.log
#binlog_do_db           = include_database_name
bind-address            = 127.0.0.1
The first of those lines is to uniquely identify our particular server, in our replication configuration. We need to uncomment that line, by removing the "#" before it. The second line indicates the file in which changes to any mysql database or table will be logged.
The third line indicates which databases we want to replicate between our servers. You can add as many databases to this line as you'd like. The article will use a single database named "example" for the purposes of simplicity. And the last line tells our server to accept connections from the internet (by not listening on 127.0.0.1).
server-id               = 1
log_bin                 = /var/log/mysql/mysql-bin.log
binlog_do_db            = example
# bind-address            = 127.0.0.1
Now we need to restart mysql:
sudo service mysql restartWe next need to change some command-line settings within our mysql instance. Back at our shell, we can get to our root mysql user by typing the following:
mysql -u root -pPlease note that the password this command will prompt you for is that of the root mysql user, not the root user on our droplet. To confirm that you are logged in to the mysql shell, the prompt should look like the following.
mysql>Once we are logged in, we need to run a few commands.
We need to create a pseudo-user that will be used for replicating data between our two VPS. The examples in this article will assume that you name this user "replicator". Replace "password" with the password you wish to use for replication.
create user 'replicator'@'%' identified by 'password';Next, we need to give this user permissions to replicate our mysql data:
grant replication slave on *.* to 'replicator'@'%';Permissions for replication cannot, unfortunately, be given on a per-database basis. Our user will only replicate the database(s) that we instruct it to in our config file.
For the final step of the initial Server C configuration, we need to get some information about the current MySQL instance which we will later provide to Server D.
The following command will output a few pieces of important information, which we will need to make note of:
show master status;The output will looking similiar to the following, and will have two pieces of critical information:
+------------------+----------+--------------+------------------+
| File             | Position | Binlog_Do_DB | Binlog_Ignore_DB |
+------------------+----------+--------------+------------------+
| mysql-bin.000001 |      107 | example      |                  |
+------------------+----------+--------------+------------------+
1 row in set (0.00 sec)
We need to make a note of the file and position which will be used in the next step.
Step 2 - Install and Configure MySQL on Server D
We need to repeat the same steps that we followed on Server C. First we need to install it, which we can do with the following command:sudo apt-get install mysql-server mysql-clientOnce the two packages are properly installed, we need to configure it in much the same way as we configured Server C. We will start by editing the /etc/mysql/my.cnf file.
sudo nano /etc/mysql/my.cnfWe need to change the same four lines in the configuration file as we changed earlier.
The defaults are listed below, followed by the changes we need to make.
#server-id              = 1
#log_bin                = /var/log/mysql/mysql-bin.log
#binlog_do_db           = include_database_name
bind-address            = 127.0.0.1
We need to change these four lines to match the lines below. Please note, that unlike Server C, the server-id for Server D cannot be set to 1.
server-id              = 2
log_bin                = /var/log/mysql/mysql-bin.log
binlog_do_db           = example
# bind-address            = 127.0.0.1
After you save and quit that file, you need to restart mysql:
sudo service mysql restartIt is time to go into the mysql shell and set some more configuration options.
mysql -u root -pFirst, just as on Server C, we are going to create the pseudo-user which will be responsible for the replication. Replace "password" with the password you wish to use.
create user 'replicator'@'%' identified by 'password';Next, we need to create the database that we are going to replicate across our VPS.
create database example;And we need to give our newly created 'replication' user permissions to replicate it.
grant replication slave on *.* to 'replicator'@'%';The next step involves taking the information that we took a note of earlier and applying it to our mysql instance. This will allow replication to begin. The following should be typed at the mysql shell:
slave stop;
CHANGE MASTER TO MASTER_HOST = '3.3.3.3', MASTER_USER = 'replicator', MASTER_PASSWORD = 'password', MASTER_LOG_FILE = 'mysql-bin.000001', MASTER_LOG_POS = 107;
slave start;
You need to replace 'password' with the password that you have chosen for replication. Your values for MASTER_LOG_FILE and MASTER_LOG_POS may differ than those above. You should copy the values that "SHOW MASTER STATUS" returns on Server C.
The last thing we have to do before we complete the mysql master-master replication is to make note of the master log file and position to use to replicate in the other direction (from Server D to Server C).
We can do that by typing the following:
SHOW MASTER STATUS;The output will look similiar to the following:
+------------------+----------+--------------+------------------+
| File             | Position | Binlog_Do_DB | Binlog_Ignore_DB |
+------------------+----------+--------------+------------------+
| mysql-bin.000004 |      107 | example      |                  |
+------------------+----------+--------------+------------------+
1 row in set (0.00 sec)
Take note of the file and position, as we will have to enter those on server C, to complete the two-way replication.
The next step will explain how to do that.
Step 3 - Completing Replication on Server C
Back on Server C, we need to finish configuring replication on the command line. Running this command will replicate all data from Server D.slave stop; CHANGE MASTER TO MASTER_HOST = '4.4.4.4', MASTER_USER = 'replicator', MASTER_PASSWORD = 'password', MASTER_LOG_FILE = 'mysql-bin.000004', MASTER_LOG_POS = 107; slave start;Keep in mind that your values may differ from those above. Please also replace the value of MASTER_PASSWORD with the password you created when setting up the replication user.
The output will look similiar to the following:
Query OK, 0 rows affected (0.01 sec)The last thing to do is to test that replication is working on both VPS. The last step will explain an easy way to test this configuration.
Step 4 - Testing Master-Master Replication
Now that have all the configuration set up, we are going to test it now. To do this, we are going to create a table in our example database on Server C and check on Server D to see if it shows up. Then, we are going to delete it from Server D and make sure it's no longer showing up on Server C.We now need to create the database that will be replicated between the servers. We can do that by typing the following at the mysql shell:
create database example;Once that's done, let's create a dummy table on Server C:
create table example.dummy (`id` varchar(10));We now are going to check Server D to see if our table exists.
show tables in example;We should see output similiar to the following:
+-------------------+
| Tables_in_example |
+-------------------+
| dummy             |
+-------------------+
1 row in set (0.00 sec)
The last test to do is to delete our dummy table from Server D. It should also be deleted from Server C.
We can do this by entering the following on Server D:
DROP TABLE dummy;To confirm this, running the "show tables" command on Server C will show no tables:
Empty set (0.00 sec)And there you have it! Working mysql master-master replication. As always, any feedback is more than welcome
Programar en Bash, pequeño manual de referencia [Cheat Sheet]
1. Cómo ejecutar scripts Bash
Para escribir en Bash puedes hacerlo directamente desde la consola/terminal de GNU/Linux, sin embargo, su mayor potencia radica en poder escribir ‘scripts’ y ejecutar piezas de código para automatizar tareas. Aquí muestro paso a paso un ejemplo.1.1. Escribe un ‘script’ Bash
Abre tu editor de textos favoritos y escribe el siguiente código.#!/bin/bash echo "Hola mundo"Guárdalo como holamundo.sh (la extensión no importa pero ésta es renococida por muchos editores de texto) .
1.2. Dale permisos
Para lanzar el ‘script’ Bash, dále permisos de ejecución. Para ello escribe en tu terminal/consola de comandos:chmod u+x holamundo.sh
Recuerda ejecutar este comando y los siguientes en la misma carpeta/directorio donde se encuentra holamundo.sh
1.3. Ejecútalo
Lanza el ‘script’ ejecutando en tu terminal/consola:./holamundo.sh
Si no ha habido ningún problema se ejecutará el ‘script’ de Bash mostrando la frase “Hola mundo”.
2. Características Bash
Aquí se mostrarán las características de dicho intérprete de comandos o shell de GNU. Recuerda que los comandos son las acciones a ejecutar desde la consola/terminal Linux. En la siguiente sección hay una recopilación de ellos.2.1. Comentarios
Los comentarios en Bash se hacen línea a línea con el símbolo #.#!/bin/bash # # Hola Mundo comentado # echo "Hola mundo"
2.2. Variables
Las variables no tienen tipo, es decir, una variable puede contener una cadena, un número, etc. sin necesidad de definirlo.La sintaxis es:
nombre_variable=valor_variable
Es obligatorio no dejar espacios antes o despues del simbolo ‘=’ ya que sino Bash interpretaría la variable como un comando Linux.
Para acceder a una variable simplemente escribe como prefijo $ en el nombre de la variable.
echo $varname
Un ejemplo sencillo:
#!/bin/bash

# Asignación y salida de variables

mivariable="Me llamo Nacho"
echo $mivariable
2.2.1. Paso de variables
Cuando ejecutas desde tu terminal/consola tienes la posibilidad de pasarle más argumentos. Por ejemplo:./miScript.sh hola 4
Para recoger estos valores escribe $ y a continuación el número de posición del argumento pasado. El primer argumento tiene valor $1, que sería ‘hola’, y el segundo argumento sería $2, en el ejemplo sería el número 4. La variable $0 es el propio nombre del archivo.
#!/bin/bash

#
# Paso de variables
#

echo "Tu primer argumento es" $1
echo "Tu segundo argumento es" $2
También hay que destacar que $? guarda el valor de salida del último comando ejecutado. $* almacena todos los argumentos y $# es el número de argumentos pasados.
2.3. Comparaciones y/o expresiones
Los condicionales y bucles se rigen mediante la evaluación de una expresión. Por eso lo primero es saber cómo programar en Bash las evaluaciones de una expresión.La evaluación de una expresión da como resultado verdadero o falso. Si la comparación o evaluación de la expresión es verdadera se ejecutará el bucle o la condicional, si es falsa la evaluación no se ejecutará.
En Bash, la sintaxis es la siguiente:
test expresiónó
[ expresión ]Un ejemplo de expresión sería [ 3 -eq 5 ] que comprueba si el valor 3 es igual a 5. Como es incorrecto, el valor que devuelve es falso. Los símbolos [ y ] tienen que estar obligatoriamente separados por un espacio.
2.3.1. Comparaciones numéricas
numero1 -eq numero2: Devuelve verdadero si 'numero1' es igual a 'numero2'.
numero1 -ge numero2: Devuelve verdadero si 'numero1' es igual o mayor a 'numero2'.
numero1 -gt numero2: Devuelve verdadero si 'numero1' es mayor a 'numero2'.
numero1 -le numero2: Devuelve verdadero si 'numero1' es igual o menor a 'numero2'.
numero1 -lt numero2: Devuelve verdadero si 'numero1' es menor a 'numero2'.
numero1 -ne numero2: Devuelve verdadero si 'numero1' no es igual a 'numero2'.
2.3.2. Comparaciones de cadenas
cadena1 = cadena2: Devuelve verdadero si 'cadena1' es idéntica a 'cadena2'.
cadena1 != cadena2: Devuelve verdadero si 'cadena1' no es idéntica a 'cadena2'.
cadena1: Devuelve verdadero si 'cadena1' es nulo (no significa que su longitud sea cero).
-n cadena1: Devuelve verdadero si la longitud de caracteres de 'cadena1' es mayor que cero.
-z cadena1: Devuelve verdadero si la longitud de caracteres de 'cadena1' es cero.
2.3.3. Comparaciones de ficheros
-d nombrefichero: Devuelve verdadero si el fichero es un directorio.
-f nombrefichero: Devuelve verdadero si el fichero es un archivo.
-r nombrefichero: Devuelve verdadero si el fichero puede ser leído.
-w nombrefichero: Devuelve verdadero si el fichero puede ser escrito.
-x nombrefichero: Devuelve verdadero si el fichero es ejecutable.
2.3.4. Comparaciones de expresiones
!expresión: Devuelve verdadero si la expresión no se cumple.
expresión1 -a expresión2: Devuelve verdadero si la expresión1 y la expresión2 se cumplen (también vale &&).
expresión1 -o expresión2: Devuelve verdadero si la expresión1 o la expresión2 se cumplen (también vale ||).
2.4. Condicionales
En programación, una sentencia condicional es una instrucción que se pueden ejecutar o no en función del valor de una expresión. En Bash, las condicionales más populares son los siguientes:2.4.1. If – Then
if [ expresión ]
then
comandos
fi
2.4.2. If – Then – Else
if [ expresión ]
then
comandos
else
comandos
fi
2.4.3. If – Then – Else if – Else
if [ expresión1 ]
then
comandos
elif [ expresión2 ]
then
comandos
else
comandos
fi
2.4.4. Case
case cadena in
cadena1)
comandos
;;
cadena2)
comandos
;;
*)
comandos
;;
esac
Se comprueba cadena. Si concuerda con cadena1 se ejecutará los comandos correspondientes hasta llegar a ;;. Lo mismo ocurre con cadena2. Si cadena no coincide con cadena1 o cadena2 entonces se ejecutará *. Se puede añadir tantas cadenas de verificación como uno desee.
2.5. Bucles
Un bucle repite los comandos que uno ha escrito tantas veces hasta que la expresión se verifique.2.5.1. For
Existen muchas maneras de realizar un bucle for en Bash. Yo sólo uso ésta:for (( inicializador; condición; incremento )) do comandos doneSu sintaxis es casi idéntica a C. Aquí un ejemplo:
#!/bin/bash
for (( c=1; c<=5; c++ ))
do
 echo "Bienvenido $c veces..."
done
2.5.2. While
while [ expresión ]
do
comandos
done
2.5.3. Until
until [ expresión ]
do
comandos
done
3. Comandos Linux
Lista de comandos más importantes según la Wikipedia.3.1. Ayuda
man: muestra manual del comando que le indiquemos.
--help: da una ayuda de los comandos.
3.2. Archivos y directorios
ls: lista los archivos y directorios.
sort: ordena alfabéticamente una lista de archivos.
cd: cambio de directorio.
pwd: muestra la ruta al directorio actual.
tree: muestra la estructura de directorios y archivos en forma gráfica.
mkdir: crea un directorio.
rmdir: borro directorios.
rm -r: borra directorios no vacíos.
cp: copia archivos.
rm: borra archivos.
mv: mueve o renombra archivos y directorios.
cat: ve el contenido de uno o varios archivos.
more: ve el contenido de los archivos.
less: ve el contenido de los archivos.
split: dividir archivos.
find: busca archivos.
locate: localiza archivos según una lista generada.
updatedb: actualiza la lista de los archivos existentes.
whereis: muestra la ubicación de un archivo.
file: muestra el tipo de archivo.
whatis: muestra descripción del archivo.
wc: cuenta líneas palabras o caracteres en un archivo.
grep: busca un texto en archivos.
head: muestra el inicio de un archivo.
tail: muestra el final de un archivo.
tailf: muestra el final de un archivo y lo que se añada en el instante (logs).
tr: reemplaza caracteres en un fichero de texto.
sed: cambia una cadena de caracteres por otra.
join: cruza la información de dos archivos y muestra las partes que se repiten.
paste: toma la primera línea de cada archivo y las combina para formar una línea de salida.
uniq: elimina líneas repetidas adyacentes del archivo entrada cuando copia al archivo salida.
cut: sirve para seleccionar columnas de una tabla o campos de cada línea de archivo.
ln: crea enlaces a archivos o carpetas.
diff: muestra las diferencias entre dos archivos.
fuser: muestra que usuario tiene en uso o bloqueado un archivo o recurso.
tar: empaqueto archivos.
gzip: comprime archivos gz.
gunzip: descomprime archivos gz.
compress: comprime archivos Z.
uncompress: descomprime archivos Z.
chmod: cambio permisos a archivos y directorios.
chown: cambio de propietario.
chgrp: cambio de grupo.
vi: abre el editor de texto vi.
pico: edita un fichero de texto.
3.3. Usuarios
adduser: agregó nuevo usuario.
useradd: agregó nuevo usuario.
userdel: borra un usuario.
passwd: permite cambiar la contraseña.
su: cambio de usuario.
whoami: muestra el nombre de usuario.
logname: muestra el nombre de usuario.
id: muestra datos de identificación del usuario.
finger: da información de usuario.
chfn: cambia la información del finger.
who: muestra los usuarios del sistema.
w: muestra un detalle de los usuarios.
last: información de los últimos usuarios que han usado el sistema.
mail: programa de correo.
pine: lector de correo en modo texto.
write: manda un mensaje a la pantalla de un usuario.
mesg: activo o desactivo recibir mensajes.
wall: mensaje a todos los usuarios.
talk: establecer una charla con otro usuario.
banner: saca letrero en la pantalla.
set: da información sobre el entorno del usuario.
addgroup: agregó nuevo grupo.
groupadd: agregó nuevo grupo.
chown: cambia el propietario de un fichero.
3.4. Procesos
top: muestra los procesos que se están ejecutando y permite matarlos.
ps: muestra la lista de procesos del usuario.
ps aux: muestra la lista de procesos de la máquina.
kill: mata proceso por ID.
killall: mata proceso por nombre.
time: mide el tiempo que tarda un proceso en ejecutarse.
fg: trae a primer plano un proceso parado o en segundo plano.
bg: pone un proceso en segundo plano.
&: colocado al final de la línea de comando ejecuta en segundo plano.
nice: ajusta la prioridad de un proceso de -20 a 19.
3.5. Discos
mount: monta un disco.
umount: desmonta un disco.
df: muestra el espacio libre de los discos.
du: muestra el espacio usado por el disco o un directorio.
mkfs: formateo un disco.
fsck: estado del disco.
fdisk: gestión de particiones.
3.6. Red
netstat: muestra estado de la red.
ifconfig: muestra la configuración del dispositivo de red.
iwconfig: muestra la configuración del dispositivo de red inalámbrico.
nmap: escanea la red y muestra los puertos que se encuentran disponibles.
ping: indica si hay respuesta por parte del servidor.
nslookup: me da la IP de nuestro servidor DNS.
telnet: me conecto a un equipo remotamente.
netconf: configuro la red.
ntop: muestra los procesos de la red.
route -n: muestra la tabla de rutas.
3.7. Sistema
rlogin: se conecta a otra máquina de forma remota (remote login).
rsh: se conecta a otra máquina de forma remota (remote shell).
ftp: se conecta a otra máquina por el protocolo ftp.
reboot: reinicia la máquina.
halt: apaga el sistema.
shutdown: apaga el sistema.
init0: apaga la máquina.
init6: reinicia la máquina.
uptime: muestra el tiempo transcurrido de encendida la máquina.
exit: cierro sesión actual.
logout: salgo del sistema.
nohup: proporciona inmunidad frente a rupturas de comunicación..
dmesg: muestra mensajes del arranque del ordenador.
history: muestra todos los comandos digitados por el usuario.
uname: da información del sistema operativo.
tee: copia la entrada estándar a la salida estándar y a un archivo.
host: muestra la dirección IP del servidor en una red local.
hostname: muestra el nombre del servidor.
umask: muestra y permite cambiar la máscara de usuario.
chroot: cambia la raíz para que root ejecute algo en forma particular.
chsh: cambia el login shell.
free: estado de la memoria.
date: muestra fecha y hora actual.
cal: muestra calendario.
clear: borro la pantalla.
at: ejecuta un comando más tarde.
env: ver variables de entorno.
export: permite el uso de variables por programas en todos los caminos del usuario.
modprobe: cargo modulo.
startx: arranca el servidor X.
xev: muestra los eventos de las teclas y el ratón.
lspci: muestra los periféricos conectados al puente pci.
lsmod: muestra los modulos cargados en el sistema.
echo: escribe un mensaje en la salida estándar.
alias: crear un alias. Un comando largo abreviado en pocas letras.
unalias: borrar un alias.
bc: calculadora.
mc: ejecuta Midnight Commander.
xkill: mata una ventana gráfica.
rpm: instala los paquetes rpm RedHat.
dpkg: instala los paquetes deb Debian.
kernelcfg: manejo los modulos cargados en el kernel.
insmod: inserta modulos en el kernel.
rmmod: elimina modulos del kernel.
updatedb: actualiza la base de datos interna de archivos.
sh: cambia al bash shell.
setxkbmap: por si no funcionan las teclas con AltGr en modo X.
4. Ejemplos
Introducir dos números diferentes e indicar cuál es el mayor
#!/bin/bash
echo "Introducir dos números:"
read A
read B
if [ $A -gt $B ]
then
 echo $A "es el mayor"
else
 echo $B "es el mayor"
fi
Pasar dos números como parámetros e indicar el menor
#!/bin/bash
echo $#
if [ $# -ne 2 ]
then
 echo "Falta algún parámetro"
elif [ $1 -eq $2 ]
 then
  echo "Son iguales"
 elif [ $1 -lt $2 ]
  then
   echo $1 "es menor"
  else
   echo $2 "es menor"
fi
Ver los procesos que está ejecutando un usuario concreto
#!/bin/bash
RES=s
while [ $RES = s ]
do
 echo "Introducir nombre de usuario:"
 read USU
 ps aux|grep $USU
 echo "¿Desea continuar?"
 read RES
done
Mostrar los usuarios que pasamos como parámetros y saber si están conectados
#!/bin/bash
for i in $*
do
 if who|grep -s $i>/dev/null
 then
  echo $i si está conectado
 else
  echo $i no está conectado
 fi
done
Bibliografía
- Informática - Ángeles Sampalo de la Torre
- Linux-SXS
- Wikipedia (comandos)